toast通知是一种跳出于屏幕表面的消息。它只占用信息所需的空间,用户当前的活动仍然是可见且能够操作的。该通知自动地淡入淡出,不接受交互事件。toast可以由后台服务创建,因此即使程序本身不可见,也能够被显示。
下面的截图展示了闹钟程序的toast通知示例。一旦闹钟被打开就会显示一条toast以确认其已经打开。 toast可以在一个活动或是一个服务中被创建并显示。如果是从服务中创建了一个toast通知,它会出现在当前处于焦点的活动之前。
如果如要用户对通知进行相应的话,考虑使用状态条通知。
基本内容
首先,用某一makeText()方法来实例化一个Toast对象。该方法需要三个参数:程序Context,文本信息,和toast的持续时间。它将返回一个正确初始化的Toast对象。可以用show()来显示该toast通知,就像下面的范例那样:
|
1 2 3 4 5 6 |
<span style="color: #000000;"><span style="color: #800080;">Context</span> context = getApplicationContext();</span> <span style="color: #000000;"><span style="color: #800080;">CharSequence</span> text = <span style="color: #008000;">"Hello toast!"</span>;</span> <span style="color: #000000;"><span style="color: #000080;">int</span> duration =<span style="color: #800080;"> Toast</span>.LENGTH_SHORT;</span> <span style="color: #000000;"><span style="color: #800080;">Toast</span> toast = <span style="color: #800080;">Toast</span>.makeText(context, text, duration);</span> <span style="color: #000000;">toast.show();</span> |
该范例演示了大部分toast通知所需的各项内容。通常不会需要使用其他代码。不过,如果想要在其他位置显示toast或是要用自己的布局替换默认的简单文字消息的话,下一节中将描述如何实现。
还可以将方法连接起来以避免持有Toast对象,就像这样:
|
1 |
<span style="color: #000000;"><span style="color: #800080;">Toast</span>.makeText(context, text, duration).show();</span> |
定位Toast通知
标准的toast通知出现在屏幕中下方。可以通过setGravity(int, int, tin)方法来改变位置。它接受三个参数:重力常量,X方向补偿和Y方向补偿。
例如,如果决定把toast置于左上角,可以这样设置重力:
|
1 |
<span style="color: #000000;">toast.setGravity(<span style="color: #800080;">Gravity</span>.TOP|<span style="color: #800080;">Gravity</span>.LEFT, <span style="color: #008080;">0</span>, <span style="color: #008080;">0</span>);</span> |
如果想要把位置推到右侧,只需增加第二个参数的值。要向下移动,就增加最后一个参数的值。
创建自定义toast视图
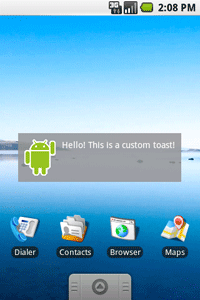
如果不满足于简单的文本消息,还可以为toast通知创建一个自定义布局。要创建自定义布局,需要通过XML或是在程序代码内定义一个View布局,然后传递根View对象至setView(View)方法。
例如,可以通过以下的XML(保存为toast_layout.xml)创建出下面截图中的布局:
|
1 2 3 4 5 6 7 8 9 10 11 12 13 14 15 16 17 18 19 |
<span style="color: #000000;"><span style="color: #000080;"><LinearLayout</span> <span style="color: #800080;">xmlns:android</span>=<span style="color: #008000;">"http://schemas.android.com/apk/res/android"</span></span> <span style="color: #000000;"><span style="color: #800080;"> android:id</span>=<span style="color: #008000;">"@+id/toast_layout_root"</span></span> <span style="color: #000000;"><span style="color: #800080;"> android:orientation</span>=<span style="color: #008000;">"horizontal"</span></span> <span style="color: #000000;"><span style="color: #800080;"> android:layout_width</span>=<span style="color: #008000;">"fill_parent"</span></span> <span style="color: #000000;"><span style="color: #800080;"> android:layout_height</span>=<span style="color: #008000;">"fill_parent"</span></span> <span style="color: #000000;"><span style="color: #800080;"> android:padding</span>=<span style="color: #008000;">"10dp"</span></span> <span style="color: #000000;"><span style="color: #800080;"> android:background</span>=<span style="color: #008000;">"#DAAA"</span></span> <span style="color: #000080;"> ></span> <span style="color: #000000;"><span style="color: #000080;"> <ImageView</span> <span style="color: #800080;">android:id</span>=<span style="color: #008000;">"@+id/image"</span></span> <span style="color: #000000;"><span style="color: #800080;"> android:layout_width</span>=<span style="color: #008000;">"wrap_content"</span></span> <span style="color: #000000;"><span style="color: #800080;"> android:layout_height</span>=<span style="color: #008000;">"fill_parent"</span></span> <span style="color: #000000;"><span style="color: #800080;"> android:layout_marginRight</span>=<span style="color: #008000;">"10dp"</span></span> <span style="color: #000080;"> /></span> <span style="color: #000000;"><span style="color: #000080;"> <TextView</span> <span style="color: #800080;">android:id</span>=<span style="color: #008000;">"@+id/text"</span></span> <span style="color: #000000;"><span style="color: #800080;"> android:layout_width</span>=<span style="color: #008000;">"wrap_content"</span></span> <span style="color: #000000;"><span style="color: #800080;"> android:layout_height</span>=<span style="color: #008000;">"fill_parent"</span></span> <span style="color: #000000;"><span style="color: #800080;"> android:textColor</span>=<span style="color: #008000;">"#FFF"</span></span> <span style="color: #000080;"> /></span> <span style="color: #000080;"></LinearLayout></span> |
请注意,LinearLayout元素的ID是“toast_layout”。必须用这个ID从XML中解压出布局内容,就像这样:
|
1 2 3 4 5 6 7 8 9 10 11 12 13 14 |
<span style="color: #000000;"><span style="color: #800080;">LayoutInflater</span> inflater = getLayoutInflater();</span> <span style="color: #000000;"><span style="color: #800080;">View</span> layout = inflater.inflate(R.layout.toast_layout,</span> <span style="color: #000000;"> (<span style="color: #800080;">ViewGroup</span>) findViewById(R.id.toast_layout_root));</span> <span style="color: #000000;"><span style="color: #800080;">ImageView</span> image = (<span style="color: #800080;">ImageView</span>) layout.findViewById(R.id.image);</span> <span style="color: #000000;">image.setImageResource(R.drawable.android);</span> <span style="color: #000000;"><span style="color: #800080;">TextView text</span> = (<span style="color: #800080;">TextView</span>) layout.findViewById(R.id.text);</span> <span style="color: #000000;">text.setText(<span style="color: #008000;">"Hello! This is a custom toast!"</span>);</span> <span style="color: #000000;"><span style="color: #800080;">Toast</span> toast = <span style="color: #000080;">new</span> <span style="color: #800080;">Toast</span>(getApplicationContext());</span> <span style="color: #000000;">toast.setGravity(<span style="color: #800080;">Gravity</span>.CENTER_VERTICAL, <span style="color: #008080;">0</span>, <span style="color: #008080;">0</span>);</span> <span style="color: #000000;">toast.setDuration(<span style="color: #800080;">Toast</span>.LENGTH_LONG);</span> <span style="color: #000000;">toast.setView(layout);</span> <span style="color: #000000;">toast.show();</span> |
首先,用getLayoutInflater()(或getSystemService())来检索,之后使用inflate(int, ViewGroup)将布局内容从XML中解压。其中第一个参数是布局资源ID,第二个参数是根View。可以在被解压的布局中找到其他的View对象,之后获取并定义ImageView和TextView元素的内容。最后,用Toast(Context)创建一个新的toast,设置其gravity和duration等属性。然后调用setView(View)将其传递给所解压的布局。现在就可以通过调用show()来显示自定义布局的toast了。
注意:除非要用setView(View)来定义布局,不然不要使用公有构造函数来构造Toast。如果没有可用的自定义布局,则必须要用makeText(Context, int, int)来创建Toast。
本作品采用知识共享 署名-非商业性使用-禁止演绎 3.0 Unported许可协议进行许可。
